Saturday, December 14, 2013

Salon Cookies for the grand opening of Beach House Salon in Boaz, AL

My friend Kelly in the last year decided to start over and she went to cosmetology school and opened her own salon in a year's time. She's done a fantastic job putting it all together and it really is like stepping into your place at the beach when you go in. I knew I wanted to do cookies for her grand opening and had told her so months ago. I couldn't decide then whether I'd do beach themed cookies or salon themed, but when she finally told me the date a week ago, I knew it would have to be salon themed because I only have a couple of beachy cutters.  Here's a pic of the lobby area at her salon, decked out with the Christmas tree.

Beach House Salon, Boaz, Alabama


I had seen these fantastic spa face cookies by Sugared Hearts Bakery some months ago and had absolutely fallen in love with them. Kelly thought they were perfect, so I set out staring at the pic to deconstruct just how she did them. Wow, there really is a lot of work to these, but the payoff is fantastic. You will notice that none of my faces look the same and I'd like to say that's because I wanted to give them all personality, but in reality it is because I lack the precision to make them uniform, but either way, they were still adorable.  I also did some nail polish ones, hair dryers, eye shadow kits and product bottles.  Notice that one product bottle is labeled, "Hair Gunk." I just couldn't resist and it was met with a lot of laughter.

Spa Cookies, Salon Cookies

Spa Cookies, Salon Cookies

Spa Cookies, Salon Cookies

Spa Cookies, Salon Cookies

Friday, December 6, 2013

War Eagle, Roll Tide and Happy Birthday Cookies

Living in Alabama, there is no escaping college football. This year was a particularly exciting Iron Bowl and I did cookies for a couple of Iron Bowl parties friends were having.

War Eagle cookies, Roll Tide cookies, Tiger Paw cookies

Auburn University cookies, University of Alabama Cookies, Paw Print Cookies


I also decided to try out the quick dry method for royal icing. My life may have been forever changed! Ha! I put the cookies in front of a fan on high for 30 minutes and then in the oven at 170 degrees (warm) for 30 minutes and they were dry enough to arrange/stack on a tray. I don't think I would do it all of the time, but for a last minute miracle, which I often need, since I wait to the last possible second to do these, well, pretty much anything else, too, it is a life saver.


Then my brother's birthday was later the same week and since Auburn pulled off the seemingly impossible and beat Alabama, and my brother is a huge Auburn fan, I did his birthday cookies in Auburn colors. Once again, I found myself waiting until the last minute to do them, so I used glaze on these, so that's why they are so shiny.

Happy Birthday cookies, Cupcake Cookies, Birthday Candle Cookies


I also did some Mr. Hankey and family cookies for him, but I won't show those here!

Sunday, November 17, 2013

Baby Shower Onesies Cookies, et al

Onesie Cookies for Baby Shower

Onesie Cookies for Baby Shower


I did these onesies for a baby shower my friend was giving for a friend of hers earlier today. The colors for little baby Liam's nursery are green, brown and yellow, so I tried to match those colors.

Cupcake Cookies

Cupcake Cookies

 My mom's birthday was the 3rd of this month. In addition to having a day at my friend's salon with her, I made these chocolate cookies. I kind of waited to the last minute to do these, so I used glaze on these instead of Royal icing. 


Halloween Cookies

Halloween Cookies
I just love Halloween and just wanted to do some Halloween cookies, although I had no one in mind to receive them. Had fun with them and just surprised a few people with some.  The rectangle ones were a fantastic pay-off for a small amount of work.  I stink at pumpkin faces, though.  LOVE how Frank turned out!  That idea for the square ones came from Lila Loa, along with great tutorials for them.


Saturday, October 12, 2013

Where Oh Where Have I Been?

After doing all of those nurse themed cookies (over 350) in July, I think I became a little burned out on doing cookies.  Thankfully that seems to have passed now.  Here are a few things I've been up to since the last post here at the first of August.

These really got me back into the swing of things.  I LOVE fall and the colors and the drop in temperatures, although it hasn't yet been a dramatic drop here (in fact, I am still getting tomatoes from my tomato plants - granted not as many as mid summer, but they are still producing and that makes me very happy since I love tomatoes so very much.  But I digress.).  Wasn't sure for whom I was doing these, I just knew that I wanted to do them.  I even took them a step further and used a pumpkin spice roll-out cookie recipe for them and they were DIVINE, not to mention beautiful, if I do say so myself.  I found this recipe for the cookies themselves and made a couple of little adjustments to it.  I increased the pumpkin spice to 3 teaspoons, ya know ya gotta have it spicy!  And I found that I needed 3.25 cups of flour for this recipe to get the dough to the correct consistency.  Oh yea, I didn't use the milk it called for at all because I thought that was weird, but just in case it was for moisture, I just put in a tablespoon of vanilla, since I was planning to bake them immediately.  Here are the results:

fall leaves, acorns, pumpkins
Fall Cookies - Autumn Cookies
Autumn Cookies
Fall leaves cookies, pumpkin cookies, acorn cookies


I also did some for my friend's mom who was going to the season opener on a bus to Atlanta for the Alabama game.  These are so very fragile.  My friend made these cute toppers to go on them.

Alabama Cookies, Crimson Tide Cookies
Alabama Cookies
Alabama Cookies, Roll Tide Cookies
Roll Tide Cookies


My niece asked me if  I would help her with doing some for the Austin Gentry Memorial Scholarship fundraiser.  Her boyfriend's cousin was killed in a car wreck a couple of years ago and his family does an annual basketball tournament to raise funds for the scholarship fund they have set up in his name.  We did 150 basketballs and created bag toppers in his school colors with a logo design very similar to the t-shirts they had for 2013.  


Basketball, Austin Gentry
Basketball cookies for Austin Gentry Memorial Scholarship


Then I just did these a couple of days ago for my friend's little girl's 3rd birthday party, which is today.  The theme was Princesses and Pirates.  I used Sofia the First as my inspiration for the coloring.  Sugarbelle gets all of the credit for the pirates. All week I kept wanting to go buy a balloon cutter for these, as well as a different tiara. In the end, I opted not to and simply used a 2.5" circle cutter and part of the negative space to create the bandana tie portion of the cookies.  I was really thinking I would like a more elaborate tiara cutter, but in the end, these worked just fine.  Also note, for some reason, the dark purple photographed very blue, but I assure you it was royal purple on the pirate bandanas.

Tiara Cookies, Pirate Cookies
Princess cookies, Pirate Cookies


Wow, I feel like a total slacker after putting down what little I have worked on for the last 2.5 months, but like I said, I'd hit a bit of a burn out point.  However, I am now looking forward to having lots of fun with some Halloween goodies!

Thursday, August 1, 2013

Dough, Paper, Scissors!

My husband asked me to do some cookies for a co-worker who will be out for a while due to knee surgery.  I searched online for various get well ideas, but most of them were the same as the nursing school set I'd done for my cousin.  Then, I came upon this from an etsy seller.  Pure genius!  I cannot even say that I was inspired by these because I did totally copy them, but feel okay about it because I am only a hobbyist at this and am doing them as a gift, so no pecuniary gain is forthcoming on my part. My husband LOVED the idea.  So, I've set to work on a get well set of 2 dozen cookies for his co-worker, but haven't yet completed the full set, which will consist of these, Rx bottles, capsules and Get Well Soon ones of some sort.  However, I was so excited by these that I couldn't wait to post about them.


"But what does this post title have to do with it?", you ask (not really, I am sure, so I am just putting thoughts in your head).  When I saw these, I knew there was no cutter like that and that I would have to hand cut them.  Problem is, I stink at hand cutting dough with a knife.  The cuts are never clean, and with the intricacies of this design, I knew that it would flop.  So my wheels started turning.  Here's what  I did:


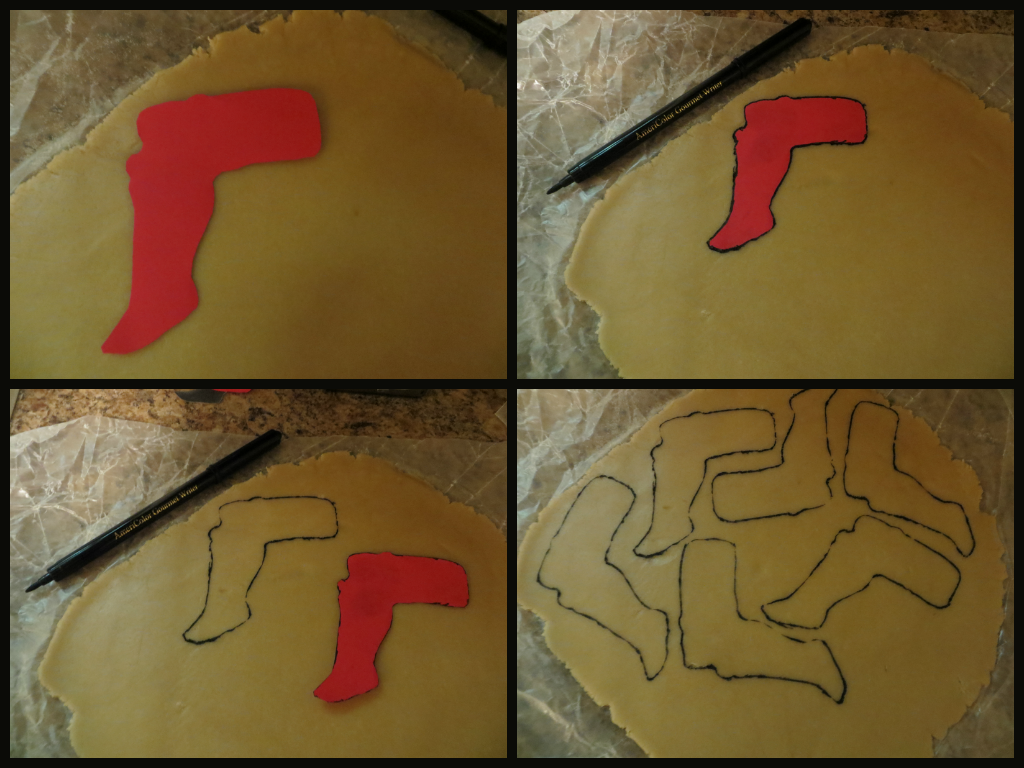
I started by creating a template (yes, I totally printed her cookies and resized them appropriately) and then tracing it directly onto my rolled out dough.  Several times, as you can see.


I then did a rough cut out of each one and froze them.  Once they were frozen and hard, I then took my handy clean kitchen scissors and went to work like a kindergartener cutting them out.  Worked like a charm!  I did find it easier to cut off the excess as I worked, instead of trying to keep one big piece of excess hanging from it as I cut.  Here's a comparison of the one I cut with a knife to the one I cut with the scissors:


See how much cleaner the scissor cut one is?  My husband couldn't really see the difference, but I totally can and you should just pretend you can too in the event you cannot. :)

Now, here's something I would note about this process that I might do differently in the future. If I had a lighter colored food color marker,  I would likely use that instead, because that black one really mucked up the remaining dough after the cuts such that I couldn't really use it because it had strong black spots all in it and thus made cookies that looked dirty.  And who wants to eat a dirty cookie?  The black would likely be fine using the chocolate cookie recipe,  although I have not yet tested how well that recipe would work with scissor cutting, as I have found it tends to be a bit delicate.

Overall I am thrilled with my idea of using scissors and can see so many possibilities for this trick in the future!  The only thing that could have made it better would have been if I'd been making reptilian Star Trek cookies and could have then named the title of this post, "Dough, Paper, Scissors, Lizard, Spock."

Monday, July 29, 2013

A Couple of Other Projects from this Month

Here is my second stab at guitar cookies.  I really dislike that cutter.  These cookies break so easily, no matter how cool they look. :(

Guitar Cookies


And here are some dinosaurs I did for a little girl's 7th birthday party.

Dinosaur Cookies


Here's another shot of them after I had started packaging them.  Found a really cool free dinosaur printable treat bag topper that I used for the small ones.  They have a lot of other items in this set besides just treat bag toppers. I heat sealed the bags with a lot of space at the top and then attached the toppers with double stick tape.

Dinosaur Cookies with Dinosaur Bag Toppers

Friday, July 19, 2013

Nurse Themed Cookies

My cousin graduated from nursing school yesterday and had asked me to do some cookies for the event.  Actually, not just some cookies but over 300, plus some for her own party that night.  I had never before tackled such a large quantity at once and wasn't really sure I was up to the challenge because, first of all, that is a lot of cookies, but secondly, I am just not set up for that sort of volume because I have zero counter space in my kitchen and usually do my cookies on a folding counter height work table.  I called my mother-in-law and asked if I could commandeer her dining room while working on these and she readily agreed.  She even helped with some of the caps and scrubs tops.

Nurse Cookies


I had been planning and planning these in my mind because I was so worried about being able to get them all done.  Initially I had planned to also include these great thermometers like Sugarbelle did, but eventually nixed the idea because I decided to keep these as simple as possible due to the volume and three colors on one cookie would have required too much drying time.  I ended up doing the ones shown as well as a reverse version of the hearts in white with red lines and blue tablets as well.

I knew I really wanted to do the nurse caps, but couldn't find a cutter for it.  Well, I could, but it was copper and I refuse to pay the prices required for copper cutters.  Cheap Cookie Cutters had one on their site, but it said it was unavailable and once again, I never received a response from them when I sent an email to inquire.  I really am baffled by the messages people post on their facebook page about excellent service, but I digress.  So, my wheels started turning.  I had a HUGE egg cutter from Easter that I found to be too large to ever use, so I broke it open and started shaping it into the nurse cap with my pliers using a picture of one of the copper ones as my guide.  I started having a little trouble at the very top making those little bitty turns, so I called my friend Patrick who is a jeweler, artist and sculptor and asked if he could help me out.  Of course, he said he would.  He quickly finished it off and soldered it closed.  And there ya go, a great nurse cap cutter that I paid nothing for!  (Check out some of Patrick's work here)

Nurse Cap Cookies


I was really excited about the way the capsules turned out.  To make them, I used the large plastic Wilton H cutter and just cut the middle of the H out and had two capsules.  If I did them again, I think  I would likely use the I instead, because these were a little longer than I wanted, but overall they worked great.  I lucked out when I went to get the rainbow nonpareil at Joann Fabrics.  Usually, they have a 40% off printable coupon each week online, but this week they had a 50% off one!  So, I paid a little over $2.00 for that container of nonpareil.  I was a little surprised that this container didn't have a shaker lid, but it was fine just to sprinkle them on with my fingers.  I first outlined and filled the white section of the capsule and then added the nonpareil.  By the time I was done with the gazillion of them I was doing, they were dry enough to come back and immediately do the red ends of the capsules.

Capsule Cookies


I had also stressed about the prescription bottles. I'd seen where others had used a simple tombstone cutter.  I was certain that I had one in that giant bag of over 200 cutters I found locally through Craigslist for a mere $20.00, but was never able to put my hands on it.  It could be that I never had one to begin with and was just somehow remembering incorrectly or perhaps I accidentally gave it to my niece when I gave her a bunch of those cutters that I already had (no worries, I still have about 130 - 150 of them that I didn't have).  I had another tombstone, but it was a little more elaborate and was a bit too dumpy for a pill bottle.  So I started racking my brain trying to figure out what I could use.  I was at my local bakery supply looking through their cutters and spotted this one and decided it was perfect:


Not too bad, huh?

Rx bottle cookies, pill cookies, capsule cookies


I was down to the wire at the end and had not done the details on the scrubs tops, but I knew I couldn't leave off the stethoscopes.  I ended up doing them with a black food color marker and I think they gave the effect they needed to, although, of course, the dimension of piping them would have been better, but time was truly running out.  I think I drew those on about 1 hour before delivery!

Scrubs top cookie
 As simple as they were, the hearts made for a life saver and they looked really great, too!  I was able to knock out about 100 of those (in both red and white, just no pic of the white) in a little over an hour.  Great payoff on a little amount of work!

Nurse themed cookies


 And the good news is that she loved them!!  She posted a pic of them on her facebook last night and noted that her really cool cousin had done them for her.  And to top that off, someone commented with, "And they tasted really good, too!!"

Mission accomplished, although I can guarantee you that I will not undertake that many at one time ever again!


Wednesday, June 26, 2013

Can Egg Free, Nut Free and Dairy Free Taste and Look Good?

Some time ago a friend had asked me to see if I could come up with some cookies for her son's birthday today because with his nut, dairy and egg allergies, he never gets a birthday cake that looks like what other kids get.  This was a huge challenge for me, but I told her I would see what I could come up with.  Of course, I first looked to see if I could find a recipe that was already out there and proven.  But I didn't find anything.  So then I decided to start with a recipe that I like and make adjustments/substitutions as necessary.  I started with my favorite plain sugar cookie recipe from Lila Loa and changed a few things. I used vegan margarine from Earth Balance and after much research and discussion decided to substitute 1/4 cup apple sauce + 1/2 tsp baking powder for the eggs.

At first as I was mixing in ingredients, it looked really scary.  But as I started adding flour, it started coming together.  Usually when I use this regular recipe, I only use from 3.75 to 4.0 cups of flour for the correct consistency, but with the extra moisture from the apple sauce I ended up using 5 cups of flour and very, very lightly dusted my waxed paper as I rolled them out and cut them. I then baked them for 8-9 minutes at 350 degrees.  I had been concerned that they might spread, so I did as I normally do anyway and put them in the freezer for about 10 minutes before putting them in the oven, and they didn't spread and held their shapes fantastically.  Here's the recipe with the adjustments:


  • 1 cup slightly softened vegan buttery sticks (2 sticks)
  • 1 cup brown sugar
  • 1/2 cup granulated white sugar
  • 1/2 cup applesauce + 1tsp baking powder
  • 2 teaspoons vanilla
  • 3/4 teaspoon salt
  • 1/4 teaspoon baking powder
  • 5 cups of flour (or to correct consistency)
Now, I don't think I would choose these over the regular version, but considering the constraints upon them, I think they turned out pretty tasty.  They also had a nice, soft consistency. This recipe made over 5 dozen, of course, 18 of those were baseball bats, which are relatively small in the grand scheme of things.

I wasn't sure about using meringue powder since he had an egg allergy, so I used a glaze and substituted water for the 2 tsps of milk the recipe  I had called for.  Of course, I still had to add a lot more, just like when I used milk the first time around with the goat cookies.  The recipe used almond extract, so  I just used vanilla instead. It dried fine and worked well, once I got used to the difference in it and the RI I am used to using. Here's the amended glaze recipe:

    1 cup confectioners' sugar

    2 teaspoons water  (keep adding until the consistency is right - it is way, way too thick per recipe)

    2 teaspoons light corn syrup

    1/4 teaspoon vanilla extract

    assorted food coloring


I didn't even have to haul out the big mixer for this - just quickly mixed it up with a fork in a bowl.

Here's how they turned out:


I didn't thicken the glaze enough for the stitching on the glove, but other than that, I think they turned out wonderfully.


These cookies were for a friend from my hometown, which is 1.75 hours away from me, and we were meeting halfway for her to get the cookies.  I was planning to do some cookies for my great nephew's second birthday this week and at the last minute decided I would do them in time to send them back to my hometown, where my great nephew now lives, with my friend as she was picking up the baseball cookies.  Because I found that the glaze was just as easy to work with as the Royal Icing I typically use, it mixes and colors super fast and it dries a lot faster, I decided to do his cookies using glaze as well.  I knocked these out in no time.  Although I had wanted to do sheriff's badges, too, I knew I wouldn't have time to get those done before I needed to leave, so I omitted them and just did these.  While they were dry to a light touch when I needed to leave, I wasn't comfortable stacking them just yet, so I used several containers and sent them in single layers because I know my sister-in-law will get my containers back to me.  Not bad for an hour's worth of decorating, huh?


I had become a bit of a Royal Icing snob over time, but after this experience, I think I'll use both Royal Icing and glaze from now on.  They each have their advantages over one another, but it is great to know that I have the option to choose depending on the circumstances and can achieve good results with both.  I will say, I do prefer the opaque finished look of Royal Icing to the somewhat translucent/shiny look of the glaze, but the speed of mixing and quick drying time of the glaze are really appealing to this person who has a tendency to wait until the last minute to do things!

Saturday, June 22, 2013

A Leg to Stand On? Flamingo Cookies

So I have this long-standing joke with my friend's mom. Back during August of the year we were awaiting our bar exam results, I went down to their hometown to visit and work in my friend's brother-in-law's office for a week.My friend's daughter and her hubby were living in her house at that time, so she was staying at her parents' house temporarily. So my accommodations for the week were out in their RV - so cool!

My friends 's mom has the most beautiful and immaculate yard. So much so that some local garden club, of which she wasn't even a member, had bestowed their "Yard of the Month" designation upon her yard, complete with their honorary yard sign. As I got to know her throughout the week, my wheels started turning. The day that I left, I ran to the party store and bought pink flamingos and put them flanking the garden club sign in her front yard, just after I left. They made it there for the next few hours, but she did discover them before night fell. Ever since, if I know I will be seeing her or my friend, I pick up some sort of little flamingo something to give/send to her. She recently sent word through my friend's sister that she far preferred cookies to flamingos, so of course, my wheels once again started turning. Here's what she got in the mail this week! 


They are more sort of coral than pink.  That's because I didn't want to waste icing I'd used on another project, which was orange-ish yellow, thus when I added the pink, it looked like this.  I decided I could live with it.  These cookies are sooooooo fragile.  My dough was a bit temperamental when cutting them, so I had to reattach the legs on almost every one of them before baking.  I feel certain that they arrived in the mail with the neck on every single one of them broken.  I broke a couple just putting them in cello bags and heat sealing them.  There was no way to wrap the sealed packs because they were so fragile, so I had to just place them individually into a box filled with packing peanuts.  Nothing has been said about their condition upon arrival, but my assumption is that my friends and their mom are just too polite to say anything.

Monday, June 17, 2013

Tying One on for Father's Day (and Playing Around with Leftovers)

Just played around with a necktie cutter that was given to me as a gift and did about 18 ties for friends to give as Father's Day gifts.


And here are some that I did just playing around with leftover cookies and icing from when I had done the birthday butterflies.  Trying to learn to do a houndstooth design, because that will be huge around here come football season.  I really love how the kitty one turned out.  


Speaking of kitties, not sure if I shared my take on the kitty I found a home for who had been hanging around our house for a couple of months, that I gave to his new family, among other kitty cookies.  He was such a sweet kitty that I just knew he'd be perfect for someone.  Found out this week that he ran away from his new home only a week after being there.  His new home is an hour and a half away from me, so I don't think he'll ever find his way back to our house, although it would totally earn him a spot as an inside kitty if he did.


Hope you are safe Mr. Kitty

Friday, June 7, 2013

Birthday Butterflies

Got a message from a friend on Sunday asking if it would be possible for me to make some butterfly cookies for his girlfriend's birthday, which is on Saturday.  Problem was that he lives in Iowa and she in Kansas, and I am in Alabama.  I think the world of him and am so happy for him with his new relationship, so I decided that even if it meant staying up late, I would get them done and shipped out in time for her birthday.  I had a lot of fun with these, because he just let me run wild, instead of specifying how they should look.  I had to rein myself in and limit the colors I would use, otherwise I would still be working on these!  lol


He didn't tell me how many he wanted, so I decided to do a dozen butterflies and you cannot have butterflies without flowers, so I did a dozen flowers too.  Actually there were 14 butterflies and 12 flowers. 

I wanted to make sure these did well in shipping, so I bagged the cookies back-to-back in sets of two in little cello bags and for the first time heat sealed the bags.  I had wondered about this and found something online recently about using a curling iron or flat iron to close cello bags, so I went out and bought a new, cheap curling iron and used a med/low setting and it worked like a charm.  I then took the 13 cello bags and wrapped, wrapped and wrapped them some more in plastic wrap. After that I filled in the box with lots of plastic wrap and enclosed the box's contents with tissue paper and wrapped it up with some of my favorite paper I found at Big Lots years ago and bought every single roll they had.  Then I made a big poofy bow for it.  


I had planned to ship them through a friend's store who has a volume shipping account with UPS to keep the shipping costs down, but my schedule didn't allow me to get over there, so I had to go to the dreaded UPS retail store.  Have I ever mentioned just how much I dislike the UPS retail store near me?  If not, well, I do - mainly because I am so cheap and it costs an arm and a leg to ship with them.  And since I didn't have my own packing supplies and a shipping box, I had to buy those too.  All total the UPS store charged me $31.47 to ship and pack a 2.0 lb. package.  Fortunately, I am being reimbursed for the shipping cost, but even still, I like to be just as frugal with other people's money as I am my own, so it pained me greatly to pay that much!   

The package is scheduled for delivery today and I'm once again stalking the tracking page!  It is out for delivery, but we all know it could be as late as 7 pm before it is delivered.  I think I am more excited than he is about her getting these.  I even signed up for UPS text messages to alert me when it has been delivered.  I'll update when it has been delivered!

Saturday, June 1, 2013

Rock On!!

Decided to try something completely different today with a lot of detail.  Of course there are things about them I don't like, but overall I am thrilled with them.  And the teenage guy they were for loved them and was amazed with all of the details.

I started by putting the center on them.  I printed a template I found online in the appropriate size and cut out the center section.  I then traced that onto the cookie with a food color marker.  Then outlined and flooded that section.  Then I outlined and filled the neck and then the rest of the body.  After everything had dried, I took the food color marker again and drew in all of the black details just doing a mental sort of gauge as to where everything should be.  Let those dry and then came the scary part - putting on the six strings.  I used my new 00 Ateco tip with piping consistency icing for those and was in pure amazement that they came out the way they did. At first draft of the green one, which was my test cookie, I didn't have the whammy bar on it, but decided that adding that just gave them that little extra something they needed.  These were pretty scary to me to tackle, but I approached it methodically over a series of hours - would work on them a bit, do something else and then come back to them - and am still alive to tell about it!  I laughed at my sister's facebook comment about them. She said, "Ok, now you are just showing out!"

Thanks to  Ellie's Bites Decorated Cookies for the tutorial on doing these. Not sure I could have done these without it!

I couldn't resist doing this with the pink ones before I delivered them!  I had to dig out my Barbie stuff from storage just for this shot!!! (Barbie - don't ask.  I have a small but cool collection of cool characters portrayed by Barbie - Bewitched Barbie, I Dream of Jeannie Barbie, Wonder Woman Barbie and Super Girl Barbie)