Tuesday, March 18, 2014

Golf Cookies

Who's your caddy? ha!  Did these to celebrate a friend's son making the golf team and his first match. Her photography of them is much better than mine was, so I'm only showing you her pic.

Golf Cookies, "Fore! Cookies"
 Earlier the same week I did a rehashing of the spa face cookies for a spa party for a fellow attorney's daughter's 10th birthday.


Spa cookies
With the dough I had left over from the spa cookies, I decided to try working with colored dough. It makes for a little more work on the front end of the process, but overall is much faster because you only have to wait for outlines to dry and no flooding the entire surface. Wouldn't do it all of the time, but it is definitely an option I will use in the future.


Cookies Made with Colored Dough

My husband's boss had his retirement party on Thursday of this week. Typically the catering department at the college does the retirement parties, but they were off this week because many of the school's departments were closed for the week during spring break. It was very important to my husband that his boss have as nice a retirement party as anyone else gets when catering does it, so I stepped in since my husband's department is comprised of all men. I did a number of things for the party, but did about 50 two inch squares with the school's logo on them. Everyone was so excited about those cookies and was baffled as to how I did them. Of course, I did the logos as Royal Icing transfers and was pretty pleased with them overall, but I did learn that air flow is VERY important in the drying process of the flooding with transfers on top of them. I typically work on plastic trays and stack the trays in alternating fashion for drying because I am sorely lacking in space. I found that the ones that were covered by a section of the tray above it did not dry as well as those that had open air space above them and got some bleeding of the black outline onto the yellow. Fortunately, I was able to salvage them by piping yellow in about a 25 second consistency back on top of the blackened yellow portions. My husband was fine with the ones that had bleeding on them, but I so was not. I thought it made them look dirty and who wants to eat dirty cookies! I also cheated and bought some oatmeal raisin and chocolate chip cookies from Costco as filler, as well as doing a veggie tray, fruit tray, cheese & crackers and nuts. They'd ordered a cake as well, which I put on a separate table. I did lemonade from a clear dispenser with lemon slices floating inside to make it pretty. I also put whole lemons in the clear section at the bottom of the dispenser. We also did coffee. I didn't know many people there, so I was easily able to eavesdrop on comments about the spread for the party and was quite pleased with what I overheard - everyone was pleased and most said the look and the taste were much better than when the catering department does the parties. :)

Birmingham- Southern College Cookie, Royal Icing Transfer


Monday, March 10, 2014

Just Horsing Around

So I did these horse cookies today for a friend's daughter's 15th birthday. She's a horse girl and does tons of shows, so this is the set I put together for her. I used this Sugarbelle tutorial for the horses and this one of hers for the bandanas. Of course, I waited until the last minute to do them, so the first icing layer on the bandanas wasn't quite dry enough for me to try marking on with the food color maker, so the yellow ones ended up with lots of cracks and squished places in them - the orange ones had a couple as well. But from a distance, they look fine! 
Horse Cookies, Bandana Cookies, Cowboy Boots Cookies and Cowboy Hats Cookies

Sunday, February 16, 2014

Hello Kitty Cookies (and a few more things)

Guess I need to get back in the habit of making posts here again. I got kind of burned out on doing cookies over Christmas and didn't do any at all in January, but once Valentine's day began approaching, the bug bit me again. Here's what I have been up to since Christmas, from now backwards.


Hello Kitty Cookies
I was terrified about tackling the Hello Kitty bodies. Not sure why exactly, but I was. I used the Sugarbelle trick for marking the eyes and nose, and even used it on the center of the bow for both the face ones and the body ones, except I used a needle instead of a push pin. On one of the bodies, I tried marking the body with random spots to give me a feel for it and it came out okay, so after that I just jumped in and did them free hand. The broke these up into a number of steps, which worked well, as the parts had a little drying time before I finished all of them and was ready to begin the next step. I started with the center of the bow, then moved on to the rest of the bow. You may find my next step odd, because it was truly a stab in the dark, but I next did the dress. Actually, I think I ended up combining the steps of the remainder of the bow and the dress into one step after I got a few under my belt. I then outlined the kitty face, ears and around the insides of the bow; then I filled the face and paws. At that point, I went to bed, because I needed a lot of drying before moving on to facial features. When I awoke, I marked the faces using the template I made with parchment paper by tracing the cardboard picture that was attached to the cutters when I bought them. I tried one set of whiskers with the black icing I was using for the eyes, but it was far too runny and I was too lazy to mix up a thicker second bottle of icing, so I just did the whiskers with a black food color marker, which I think looks great.

Hello Kitty Face Cookies

Valentine Cookies

Champagne cookies, Valentine Cookies
I am not sure what the heck was going on with the champagne - both the bottles and the glasses. I messed up mixing the color and added bronze and it ended up darkish orange-ish. So to compensate, I added a ton of white food coloring, which is super watery, along with some shades of yellow gel icing. I think I must have had way too much coloring in that little bit of icing because it just didn't want to dry and was a little odd in consistency as it did finally dry (used the oven on warm 170 degrees for an hour), even though it was made from the same batch of icing of all of the other cookies shown with it. Lesson learned about using too much coloring to make up for mistakes. Just start over.

Valentine Cookie Bouquet

Eye glasses cookies

Eye glasses decorated cookies

Christmas decorated cookies
There were so very many Christmas cookies that I wanted to do, but just simply ran out of time to do. I had about a gazillion cutters laid out to use over the month, but just never got to many of them. Here are the ones I did get to. The cookie wreath and the reindeer were last second throw-togethers with leftover icing. Actually, the wreath uses both glaze and royal icing because I didn't have enough of either left over to do them any one way and the glaze is much easier to mix up, but I am just not thrilled with the finish of those and my sloppy work on them. But the person I gave them to didn't seem at all bothered - don't think she even noticed, as she raved and raved over them.
Christmas Tree decorated cookies

Holly leaf Christmas cookie wreath

Reindeer Christmas decorated cookie

Saturday, December 14, 2013

Salon Cookies for the grand opening of Beach House Salon in Boaz, AL

My friend Kelly in the last year decided to start over and she went to cosmetology school and opened her own salon in a year's time. She's done a fantastic job putting it all together and it really is like stepping into your place at the beach when you go in. I knew I wanted to do cookies for her grand opening and had told her so months ago. I couldn't decide then whether I'd do beach themed cookies or salon themed, but when she finally told me the date a week ago, I knew it would have to be salon themed because I only have a couple of beachy cutters.  Here's a pic of the lobby area at her salon, decked out with the Christmas tree.

Beach House Salon, Boaz, Alabama


I had seen these fantastic spa face cookies by Sugared Hearts Bakery some months ago and had absolutely fallen in love with them. Kelly thought they were perfect, so I set out staring at the pic to deconstruct just how she did them. Wow, there really is a lot of work to these, but the payoff is fantastic. You will notice that none of my faces look the same and I'd like to say that's because I wanted to give them all personality, but in reality it is because I lack the precision to make them uniform, but either way, they were still adorable.  I also did some nail polish ones, hair dryers, eye shadow kits and product bottles.  Notice that one product bottle is labeled, "Hair Gunk." I just couldn't resist and it was met with a lot of laughter.

Spa Cookies, Salon Cookies

Spa Cookies, Salon Cookies

Spa Cookies, Salon Cookies

Spa Cookies, Salon Cookies

Friday, December 6, 2013

War Eagle, Roll Tide and Happy Birthday Cookies

Living in Alabama, there is no escaping college football. This year was a particularly exciting Iron Bowl and I did cookies for a couple of Iron Bowl parties friends were having.

War Eagle cookies, Roll Tide cookies, Tiger Paw cookies

Auburn University cookies, University of Alabama Cookies, Paw Print Cookies


I also decided to try out the quick dry method for royal icing. My life may have been forever changed! Ha! I put the cookies in front of a fan on high for 30 minutes and then in the oven at 170 degrees (warm) for 30 minutes and they were dry enough to arrange/stack on a tray. I don't think I would do it all of the time, but for a last minute miracle, which I often need, since I wait to the last possible second to do these, well, pretty much anything else, too, it is a life saver.


Then my brother's birthday was later the same week and since Auburn pulled off the seemingly impossible and beat Alabama, and my brother is a huge Auburn fan, I did his birthday cookies in Auburn colors. Once again, I found myself waiting until the last minute to do them, so I used glaze on these, so that's why they are so shiny.

Happy Birthday cookies, Cupcake Cookies, Birthday Candle Cookies


I also did some Mr. Hankey and family cookies for him, but I won't show those here!

Sunday, November 17, 2013

Baby Shower Onesies Cookies, et al

Onesie Cookies for Baby Shower

Onesie Cookies for Baby Shower


I did these onesies for a baby shower my friend was giving for a friend of hers earlier today. The colors for little baby Liam's nursery are green, brown and yellow, so I tried to match those colors.

Cupcake Cookies

Cupcake Cookies

 My mom's birthday was the 3rd of this month. In addition to having a day at my friend's salon with her, I made these chocolate cookies. I kind of waited to the last minute to do these, so I used glaze on these instead of Royal icing. 


Halloween Cookies

Halloween Cookies
I just love Halloween and just wanted to do some Halloween cookies, although I had no one in mind to receive them. Had fun with them and just surprised a few people with some.  The rectangle ones were a fantastic pay-off for a small amount of work.  I stink at pumpkin faces, though.  LOVE how Frank turned out!  That idea for the square ones came from Lila Loa, along with great tutorials for them.


Saturday, October 12, 2013

Where Oh Where Have I Been?

After doing all of those nurse themed cookies (over 350) in July, I think I became a little burned out on doing cookies.  Thankfully that seems to have passed now.  Here are a few things I've been up to since the last post here at the first of August.

These really got me back into the swing of things.  I LOVE fall and the colors and the drop in temperatures, although it hasn't yet been a dramatic drop here (in fact, I am still getting tomatoes from my tomato plants - granted not as many as mid summer, but they are still producing and that makes me very happy since I love tomatoes so very much.  But I digress.).  Wasn't sure for whom I was doing these, I just knew that I wanted to do them.  I even took them a step further and used a pumpkin spice roll-out cookie recipe for them and they were DIVINE, not to mention beautiful, if I do say so myself.  I found this recipe for the cookies themselves and made a couple of little adjustments to it.  I increased the pumpkin spice to 3 teaspoons, ya know ya gotta have it spicy!  And I found that I needed 3.25 cups of flour for this recipe to get the dough to the correct consistency.  Oh yea, I didn't use the milk it called for at all because I thought that was weird, but just in case it was for moisture, I just put in a tablespoon of vanilla, since I was planning to bake them immediately.  Here are the results:

fall leaves, acorns, pumpkins
Fall Cookies - Autumn Cookies
Autumn Cookies
Fall leaves cookies, pumpkin cookies, acorn cookies


I also did some for my friend's mom who was going to the season opener on a bus to Atlanta for the Alabama game.  These are so very fragile.  My friend made these cute toppers to go on them.

Alabama Cookies, Crimson Tide Cookies
Alabama Cookies
Alabama Cookies, Roll Tide Cookies
Roll Tide Cookies


My niece asked me if  I would help her with doing some for the Austin Gentry Memorial Scholarship fundraiser.  Her boyfriend's cousin was killed in a car wreck a couple of years ago and his family does an annual basketball tournament to raise funds for the scholarship fund they have set up in his name.  We did 150 basketballs and created bag toppers in his school colors with a logo design very similar to the t-shirts they had for 2013.  


Basketball, Austin Gentry
Basketball cookies for Austin Gentry Memorial Scholarship


Then I just did these a couple of days ago for my friend's little girl's 3rd birthday party, which is today.  The theme was Princesses and Pirates.  I used Sofia the First as my inspiration for the coloring.  Sugarbelle gets all of the credit for the pirates. All week I kept wanting to go buy a balloon cutter for these, as well as a different tiara. In the end, I opted not to and simply used a 2.5" circle cutter and part of the negative space to create the bandana tie portion of the cookies.  I was really thinking I would like a more elaborate tiara cutter, but in the end, these worked just fine.  Also note, for some reason, the dark purple photographed very blue, but I assure you it was royal purple on the pirate bandanas.

Tiara Cookies, Pirate Cookies
Princess cookies, Pirate Cookies


Wow, I feel like a total slacker after putting down what little I have worked on for the last 2.5 months, but like I said, I'd hit a bit of a burn out point.  However, I am now looking forward to having lots of fun with some Halloween goodies!

Thursday, August 1, 2013

Dough, Paper, Scissors!

My husband asked me to do some cookies for a co-worker who will be out for a while due to knee surgery.  I searched online for various get well ideas, but most of them were the same as the nursing school set I'd done for my cousin.  Then, I came upon this from an etsy seller.  Pure genius!  I cannot even say that I was inspired by these because I did totally copy them, but feel okay about it because I am only a hobbyist at this and am doing them as a gift, so no pecuniary gain is forthcoming on my part. My husband LOVED the idea.  So, I've set to work on a get well set of 2 dozen cookies for his co-worker, but haven't yet completed the full set, which will consist of these, Rx bottles, capsules and Get Well Soon ones of some sort.  However, I was so excited by these that I couldn't wait to post about them.


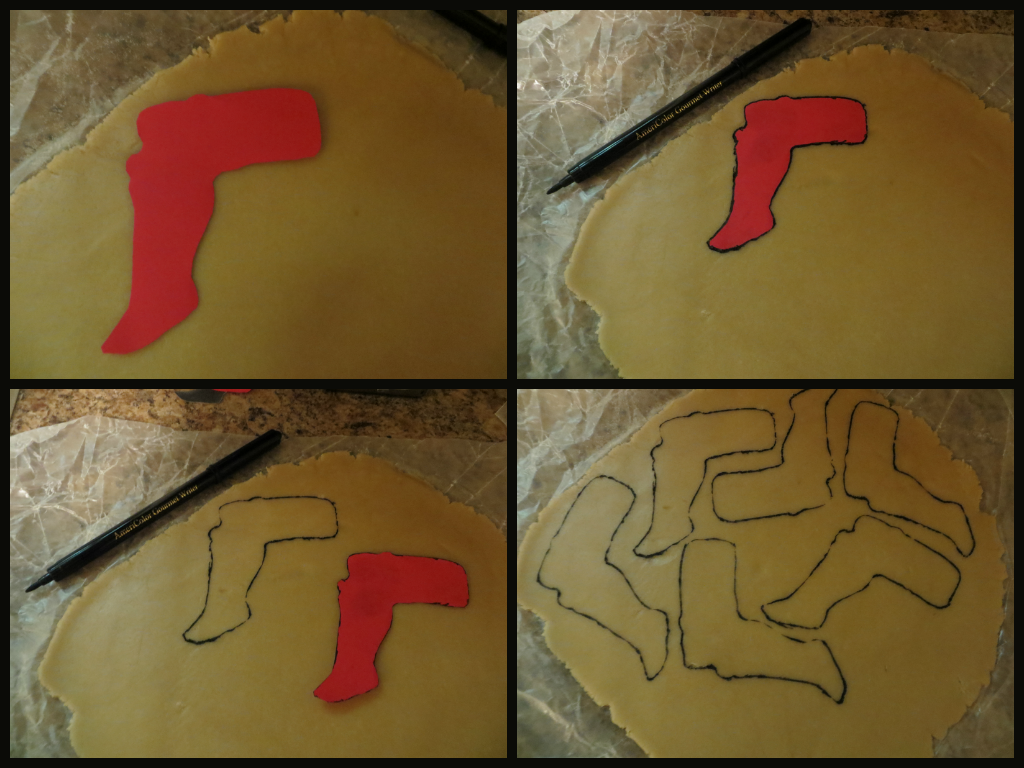
"But what does this post title have to do with it?", you ask (not really, I am sure, so I am just putting thoughts in your head).  When I saw these, I knew there was no cutter like that and that I would have to hand cut them.  Problem is, I stink at hand cutting dough with a knife.  The cuts are never clean, and with the intricacies of this design, I knew that it would flop.  So my wheels started turning.  Here's what  I did:


I started by creating a template (yes, I totally printed her cookies and resized them appropriately) and then tracing it directly onto my rolled out dough.  Several times, as you can see.


I then did a rough cut out of each one and froze them.  Once they were frozen and hard, I then took my handy clean kitchen scissors and went to work like a kindergartener cutting them out.  Worked like a charm!  I did find it easier to cut off the excess as I worked, instead of trying to keep one big piece of excess hanging from it as I cut.  Here's a comparison of the one I cut with a knife to the one I cut with the scissors:


See how much cleaner the scissor cut one is?  My husband couldn't really see the difference, but I totally can and you should just pretend you can too in the event you cannot. :)

Now, here's something I would note about this process that I might do differently in the future. If I had a lighter colored food color marker,  I would likely use that instead, because that black one really mucked up the remaining dough after the cuts such that I couldn't really use it because it had strong black spots all in it and thus made cookies that looked dirty.  And who wants to eat a dirty cookie?  The black would likely be fine using the chocolate cookie recipe,  although I have not yet tested how well that recipe would work with scissor cutting, as I have found it tends to be a bit delicate.

Overall I am thrilled with my idea of using scissors and can see so many possibilities for this trick in the future!  The only thing that could have made it better would have been if I'd been making reptilian Star Trek cookies and could have then named the title of this post, "Dough, Paper, Scissors, Lizard, Spock."

Monday, July 29, 2013

A Couple of Other Projects from this Month

Here is my second stab at guitar cookies.  I really dislike that cutter.  These cookies break so easily, no matter how cool they look. :(

Guitar Cookies


And here are some dinosaurs I did for a little girl's 7th birthday party.

Dinosaur Cookies


Here's another shot of them after I had started packaging them.  Found a really cool free dinosaur printable treat bag topper that I used for the small ones.  They have a lot of other items in this set besides just treat bag toppers. I heat sealed the bags with a lot of space at the top and then attached the toppers with double stick tape.

Dinosaur Cookies with Dinosaur Bag Toppers

Friday, July 19, 2013

Nurse Themed Cookies

My cousin graduated from nursing school yesterday and had asked me to do some cookies for the event.  Actually, not just some cookies but over 300, plus some for her own party that night.  I had never before tackled such a large quantity at once and wasn't really sure I was up to the challenge because, first of all, that is a lot of cookies, but secondly, I am just not set up for that sort of volume because I have zero counter space in my kitchen and usually do my cookies on a folding counter height work table.  I called my mother-in-law and asked if I could commandeer her dining room while working on these and she readily agreed.  She even helped with some of the caps and scrubs tops.

Nurse Cookies


I had been planning and planning these in my mind because I was so worried about being able to get them all done.  Initially I had planned to also include these great thermometers like Sugarbelle did, but eventually nixed the idea because I decided to keep these as simple as possible due to the volume and three colors on one cookie would have required too much drying time.  I ended up doing the ones shown as well as a reverse version of the hearts in white with red lines and blue tablets as well.

I knew I really wanted to do the nurse caps, but couldn't find a cutter for it.  Well, I could, but it was copper and I refuse to pay the prices required for copper cutters.  Cheap Cookie Cutters had one on their site, but it said it was unavailable and once again, I never received a response from them when I sent an email to inquire.  I really am baffled by the messages people post on their facebook page about excellent service, but I digress.  So, my wheels started turning.  I had a HUGE egg cutter from Easter that I found to be too large to ever use, so I broke it open and started shaping it into the nurse cap with my pliers using a picture of one of the copper ones as my guide.  I started having a little trouble at the very top making those little bitty turns, so I called my friend Patrick who is a jeweler, artist and sculptor and asked if he could help me out.  Of course, he said he would.  He quickly finished it off and soldered it closed.  And there ya go, a great nurse cap cutter that I paid nothing for!  (Check out some of Patrick's work here)

Nurse Cap Cookies


I was really excited about the way the capsules turned out.  To make them, I used the large plastic Wilton H cutter and just cut the middle of the H out and had two capsules.  If I did them again, I think  I would likely use the I instead, because these were a little longer than I wanted, but overall they worked great.  I lucked out when I went to get the rainbow nonpareil at Joann Fabrics.  Usually, they have a 40% off printable coupon each week online, but this week they had a 50% off one!  So, I paid a little over $2.00 for that container of nonpareil.  I was a little surprised that this container didn't have a shaker lid, but it was fine just to sprinkle them on with my fingers.  I first outlined and filled the white section of the capsule and then added the nonpareil.  By the time I was done with the gazillion of them I was doing, they were dry enough to come back and immediately do the red ends of the capsules.

Capsule Cookies


I had also stressed about the prescription bottles. I'd seen where others had used a simple tombstone cutter.  I was certain that I had one in that giant bag of over 200 cutters I found locally through Craigslist for a mere $20.00, but was never able to put my hands on it.  It could be that I never had one to begin with and was just somehow remembering incorrectly or perhaps I accidentally gave it to my niece when I gave her a bunch of those cutters that I already had (no worries, I still have about 130 - 150 of them that I didn't have).  I had another tombstone, but it was a little more elaborate and was a bit too dumpy for a pill bottle.  So I started racking my brain trying to figure out what I could use.  I was at my local bakery supply looking through their cutters and spotted this one and decided it was perfect:


Not too bad, huh?

Rx bottle cookies, pill cookies, capsule cookies


I was down to the wire at the end and had not done the details on the scrubs tops, but I knew I couldn't leave off the stethoscopes.  I ended up doing them with a black food color marker and I think they gave the effect they needed to, although, of course, the dimension of piping them would have been better, but time was truly running out.  I think I drew those on about 1 hour before delivery!

Scrubs top cookie
 As simple as they were, the hearts made for a life saver and they looked really great, too!  I was able to knock out about 100 of those (in both red and white, just no pic of the white) in a little over an hour.  Great payoff on a little amount of work!

Nurse themed cookies


 And the good news is that she loved them!!  She posted a pic of them on her facebook last night and noted that her really cool cousin had done them for her.  And to top that off, someone commented with, "And they tasted really good, too!!"

Mission accomplished, although I can guarantee you that I will not undertake that many at one time ever again!